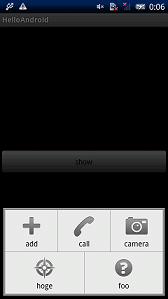
オプションメニューみたいなダイアログを無理やり実装してみた
Android端末のMENUキーを押すと、下からせり上がってくるダイアログがありますよね。
こんな感じのダイアログ

普通はMenuクラスを使ってオプションメニューを生成すれば良いのですが、
それだけだと物足りない人もいると思います。
今回は自前で実装しようと思い、どうやって作ってるのか色々調べたんですが、なかなか情報が出てきません。
仕方が無いので、なんだかそれっぽいのを無理やり実装してみました。(多分他にもやり方があると思います)
完成時のキャプチャ

(本当は動画を貼り付けたかったんですが、処理落ちが酷いので断念しました)
実装方法
ダイアログのテーマをカスタマイズして実装します。
具体的には
- リソースを幾つか用意
- メニューとなるレイアウトを作成しておく
- アニメーションを作成
- ダイアログのテーマを変更
リソースを用意する
メニューボタンを押したときの画像を3つ用意します。

左からbutton1.png, button2.png, button3.png とします。
これらを組み合わせてボタンを押したときの動作を定義しておきます。
(drawableフォルダに入れておきます)
btnstate.xml
<?xml version="1.0" encoding="utf-8"?>
<selector xmlns:android="http://schemas.android.com/apk/res/android">
    <!-- ? -->
    <item
        android:state_enabled="true"
        android:state_window_focused="false"
        android:drawable="@drawable/button3" />

    <!-- ? -->
    <item
        android:state_enabled="false"
        android:state_window_focused="false"
        android:drawable="@drawable/button3" />

    <!-- 押下中-->
    <item
        android:state_pressed="true"
        android:drawable="@drawable/button1" />

    <!-- 選択中 -->
    <item
        android:state_focused="true"
        android:state_enabled="true"
        android:drawable="@drawable/button2" />

    <!-- 非選択-->
    <item
        android:state_enabled="true"
        android:drawable="@drawable/button3" />

    <!-- 無効だけど選択中 -->
    <item
        android:state_focused="true"
        android:drawable="@drawable/button2" />
</selector>
オプションメニューとなるレイアウトの作成
レイアウトとなるViewの下側1/3だけ見せたいので、
ちょっとした小細工をしなければいけません。
menu_view.xml
<?xml version="1.0" encoding="utf-8"?>
<RelativeLayout
    xmlns:android="http://schemas.android.com/apk/res/android"
    android:layout_width="fill_parent"
    android:layout_height="fill_parent"
    android:background="#00000000">

    <LinearLayout
        android:layout_width="fill_parent"
        android:orientation="vertical"
        android:layout_height="fill_parent">
        <LinearLayout
            android:layout_width="fill_parent"
            android:layout_height="fill_parent"
            android:layout_weight="1">
        </LinearLayout>
        <LinearLayout
            android:layout_width="fill_parent"
            android:layout_height="fill_parent"
            android:layout_weight="1">
        </LinearLayout>
        <LinearLayout
            android:background="#ff909090"
            android:layout_width="fill_parent"
            android:layout_height="fill_parent"
            android:orientation="vertical"
            android:padding="4dip"
            android:layout_weight="1">
            <LinearLayout
                android:layout_width="fill_parent"
                android:layout_height="fill_parent"
                android:orientation="horizontal"
                android:background="#FFF0F0F0"
                android:layout_weight="1">
                <Button
                    android:background="@drawable/btnstate"
                    android:layout_width="fill_parent"
                    android:layout_height="fill_parent"
                    android:drawableTop="@android:drawable/ic_menu_add"
                    android:text="add"
                    android:layout_weight="1">
                </Button>
                <LinearLayout
                    android:layout_width="1px"
                    android:background="#ff909090"
                    android:layout_height="fill_parent">
                </LinearLayout>
                <Button
                    android:background="@drawable/btnstate"
                    android:layout_width="fill_parent"
                    android:layout_height="fill_parent"
                    android:drawableTop="@android:drawable/ic_menu_call"
                    android:text="call"
                    android:layout_weight="1">
                </Button>
                <LinearLayout
                    android:layout_width="1px"
                    android:background="#ff909090"
                    android:layout_height="fill_parent">
                </LinearLayout>
                <Button
                    android:background="@drawable/btnstate"
                    android:layout_width="fill_parent"
                    android:layout_height="fill_parent"
                    android:drawableTop="@android:drawable/ic_menu_camera"
                    android:text="camera"
                    android:layout_weight="1">
                </Button>
            </LinearLayout>
            <LinearLayout
                android:layout_width="fill_parent"
                android:background="#ff909090"
                android:layout_height="1px">
            </LinearLayout>
            <LinearLayout
                android:layout_width="fill_parent"
                android:layout_height="fill_parent"
                android:orientation="horizontal"
                android:background="#FFF0F0F0"
                android:layout_weight="1">
                <Button
                    android:background="@drawable/btnstate"
                    android:layout_width="fill_parent"
                    android:layout_height="fill_parent"
                    android:drawableTop="@android:drawable/ic_menu_compass"
                    android:text="hoge"
                    android:layout_weight="1">
                </Button>
                <LinearLayout
                    android:layout_width="1px"
                    android:background="#ff909090"
                    android:layout_height="fill_parent">
                </LinearLayout>
                <Button
                    android:background="@drawable/btnstate"
                    android:layout_width="fill_parent"
                    android:layout_height="fill_parent"
                    android:drawableTop="@android:drawable/ic_menu_help"
                    android:text="foo"
                    android:layout_weight="1">
                </Button>
            </LinearLayout>
        </LinearLayout>
    </LinearLayout>
</RelativeLayout>
アニメーションの作成
通常のダイアログだと、フェードインしながら表示されますが、
オプションメニューは下からせり上がってくるので、それと同じようなアニメーションも
作成します。
ダイアログが表示、非表示されたときの2パターンを作成します。(animフォルダに格納します)
dialog_anim_enter.xml (表示するとき)
<?xml version="1.0" encoding="utf-8"?>
<set xmlns:android="http://schemas.android.com/apk/res/android">
    <translate
        android:fromYDelta="20%"
        android:toYDelta="0"
        android:fillAfter="true"
        android:duration="200">
    </translate>
    <alpha
        android:fromAlpha="0.0"
        android:toAlpha="1.0"
        android:duration="200"
        android:fillAfter="true">
    </alpha>
</set>
dialog_anim_exit.xml (非表示するとき)
<?xml version="1.0" encoding="utf-8"?>
<set xmlns:android="http://schemas.android.com/apk/res/android">
    <translate
        android:fromYDelta="0"
        android:toYDelta="20%"
        android:duration="200"
        android:fillAfter="true">
    </translate>
    <alpha
        android:fromAlpha="1.0"
        android:toAlpha="0.0"
        android:duration="200"
        android:fillAfter="true">
    </alpha>
</set>
ダイアログのテーマを変更
普通のダイアログだと黒い半透明の背景画像がセットされてますので、
これを完全に透明な画像と差し替えて、先程作ったアニメーションに変更します。
<?xml version="1.0" encoding="utf-8"?>
<resources>
    <style name="MenuDialog" parent="@android:style/Theme.Dialog">
        <item name="android:windowBackground">@drawable/button1</item>
        <item name="android:windowAnimationStyle">@style/Animation.MenuDialog</item>
    </style>
    <style name="Animation.MenuDialog" parent="@android:style/Animation.Dialog">
        <item name="android:windowEnterAnimation">@anim/dialog_anim_enter</item>
        <item name="android:windowExitAnimation">@anim/dialog_anim_exit</item>
    </style>
</resources>
ダイアログを実装してみる
HelloWorldを改造してボタンを押すとダイアログが表示されるようにしたいと思います。
main.xml
<?xml version="1.0" encoding="utf-8"?>
<LinearLayout
    xmlns:android="http://schemas.android.com/apk/res/android"
    android:layout_width="fill_parent"
    android:layout_height="fill_parent"
    android:gravity="center">
    <Button
        android:id="@+id/Button01"
        android:layout_width="fill_parent"
        android:layout_height="wrap_content"
        android:text="show">
    </Button>
</LinearLayout>
Hello.java
package org.example.kyoto.japan.mofumofu.hello;

import android.app.Activity;
import android.app.Dialog;
import android.content.Context;
import android.graphics.Bitmap;
import android.os.Bundle;
import android.view.Display;
import android.view.View;
import android.view.Window;
import android.view.WindowManager;
import android.view.View.OnClickListener;
import android.widget.Button;
import android.widget.ImageView;

public class Hello extends Activity implements OnClickListener {
    /** Called when the activity is first created. */
    @Override
    public void onCreate(Bundle savedInstanceState) {

        super.onCreate(savedInstanceState);
        setContentView(R.layout.main);
        ((Button)this.findViewById(R.id.Button01)).setOnClickListener(this);
    }

    public void onClick(View arg0) {

        MenuDialog d = new MenuDialog(this);
        d.show();
    }

    public class MenuDialog extends Dialog implements OnClickListener {

        public MenuDialog(Context context) {

            super(context, R.style.MenuDialog);
            requestWindowFeature(Window.FEATURE_NO_TITLE);
            this.setContentView(R.layout.menu_view);

            int []btn = {
                    R.id.Button01,  R.id.Button02,  R.id.Button03,
                    R.id.Button04,  R.id.Button05,
            };
            for (int id : btn) {
                ((Button)this.findViewById(id)).setOnClickListener(this);
            }
        }

        public void onClick(View v) {
            dismiss();
        }
    }
}
完成
ではビルドして動かしてみます。(動画じゃなくて残念です)

showボタンを押すと…

下からヌルヌルとせり上がってきました!
ボタンを押せばダイアログは閉じます。
何も無いところをクリックした時にダイアログを閉じたい場合は、
LinearLayoutにIDを付加して、OnTouchイベント実装すれば良いと思います。
参考サイト
throw Life Dialogをアニメーションさせる方法
Android Button の色や画像を変える
LVL (License Verification Library) を使ってみた
今回はAndroidアプリの不正利用を防ぐためのライブラリ「LVL」を使ってみました。
LVLとは
Androidアプリケーションの不正な利用を制止するための仕組みです。
Developerがこのライブラリを導入すると、Googleの強力なサーバー認証システムを利用して正規ユーザーか、不正利用ユーザーかを判別することが可能です。
去年の秋頃にAndroidSDKToolsに導入されたようですが、公式HPの説明を見てもイマイチ使い方が分かりませんでしたが、とりあえず使ってみました。
LVLは必要なのか
不正利用の防止はコピーガード機能とLVLを使えますが、コピーガード機能については不完全です。
現状ではAndroid端末のrootを取得すれば、コピープロテクトのかかっているアプリでもコピーが可能です。
(専用ツールが存在するようです)
詳しい手順は記述できませんが、返品可能期間が15分になった現在でもそれは可能です。
特に日本以外で有料アプリを公開する場合はLVLを実装したほうが無難ですね。
下記リンク先のディスカッションが参考になります
http://www.mailinglistarchive.com/html/android-group-japan@googlegroups.com/2010-10/msg00221.html
LVLの仕組みについて
LVLの詳しい仕組みについては、本家サイトが参考になります。
http://developer.android.com/intl/ja/guide/publishing/licensing.html
英語が苦手な方は本家サイトを見るより、ソースコードを見たほうが手っ取り早いと思います。
肝となるソースはLicenseValidator、LicenseChecker、ServerManagedPolicyでしょうか。
LicenseValidatorはレスポンスコードを判定します。
LicenseCheckerはサーバーとのやり取りに使われる?
ServerManagedPolicyはサーバーからの認証結果を暗号化して保存します。
次回サーバーに接続できなかったときは、こちらのキャッシュしたデータを使ってるみたいです。
保存するデータは最終レスポンスコード、VT、GT、RT、UT等ですが、UTはあまり気にしなくても良いです。
VTは次回ライセンス認証を行うまでの有効な期間をミリ秒で表します。
GTはローカルで使用できるアプリケーションの有効な期間をミリ秒で表します。
RTはローカルで使用できるアプリケーションの有効な起動回数を表します。
ありえないとは思いますが、有料アプリをダウンロードした直後、ネットに接続していない状態でアプリを起動すると
VT,GT,RTのデフォルト値が参照されますので、ハードコーディングしていない場合は、NOT_LICENSEDになると思います。
LVLの実装
LVLに付属しているサンプルソースを参考にすれば、かんたんに実装できると思います。
検証方法
LVLの検証方法ですが、デベローパーコンソールのプロフィール編集リンクを辿ると、LVLに関する設定項目があります。
テストアカウント:テスト応答を受信するアカウントです。このアカウントと結びついた端末にテスト応答を返します。
ライセンステスト応答:ここで設定した値がテスト応答のレスポンスコードになります。
検証したいLVLのアプリケーションを一旦マーケットにアップロードします。(下書き状態で大丈夫です)
アップロードしておかないと、レスポンスコードがアプリケーションエラーで返ってくると思います。
テストアカウントとテスト応答を設定して、正常に処理できるかテストします。VT,GT,RT値も返ってくるので確認できます。
単に不正利用を防止するだけなら上記の実装で十分ですが、アプリケーションが改竄されることを考えるとまだまだ物足りない感じですね。
参考サイト
http://mokkouyou.blog114.fc2.com/blog-entry-72.html#comment35
http://d.hatena.ne.jp/vvakame/searchdiary?word=LVL&.submit=%B8%A1%BA%F7&type=detail
http://y-anz-m.blogspot.com/2010/10/androidlvl-securing-android-lvl.html
http://developer.android.com/intl/ja/guide/publishing/licensing.html#app-publishing
http://android-developers.blogspot.com/2010/09/securing-android-lvl-applications.html
http://android-developers.blogspot.com/2010/09/securing-android-lvl-applications.html
画面幅が狭くてadmobの広告が表示できないときの対処法
admobは画面幅が最低でも320dp以上ないと、広告を表示してくれません。
QVGAやHVGAでも画面幅は320dp以上あるのに、広告が表示されないということは、ActivityのテーマをDialogにしている場合が多いのではないでしょうか。
解決方法
- 広告を表示するのをやめる
- Activityのテーマを変える
- Dialogテーマをカスタマイズする
2.ActivityのテーマをDialogにしなければ、admobも問題なく表示されることだと思います。
3.どうしてもActivityをDialogで表示したい場合は、Dialogのテーマをカスタマイズするしか有りません。
カスタマイズする方法としては、Dialogテーマの背景画像を差し替えるだけでOKです。
画像を差し替える理由
Theme.Dialogには、次のような余白を含む画像リソースが使われています。

上記の余白のせいで、広告を表示する320dpを確保できなかったわけです。
ですので、余白のない画像リソースを使えば表示幅も320dpを確保できるわけです。

カスタマイズしてみる
具体的には、styles.xmlにTheme.Dialogを継承したstyleを定義します。
次のようにします
<?xml version="1.0" encoding="utf-8"?>
<resources>

    <style name="FillDialog" parent="@android:style/Theme.Dialog">
        <item name="android:windowBackground">@drawable/my_dialog</item>
    </style>
</resources>
上記スタイルをAndroid.manifest内のActivityに適用します。
動的に並び替えできるRadioButtonのレイアウトを作ってみた
先日、僕の作成したかんたん家計簿でViewの並びかえを行う処理を実装しました。
今回は、その時に使ったソースコードの一部を抜粋して、動的に並び替えできるRadioButtonについて解説したいと思います。
何故ListViewでなくRadioButtonなのか
理由は簡単。ListViewで実装するより、RadioButtonの方が簡単にできると思ったからです…(^^;
ListViewの動的な並び替えはかなり難易度が高そうです。実際ググッてもピンとくる情報がヒットしなかったので、今回はRadioButtonをListViewに見立てて、強引にそれっぽいものを作ってみました。
レイアウト構成
ListViewのようにスクロールできることが前提条件となりますので、
RelativeLayoutの下にScrollView、ScrollViewの下にRadioGroupを配置します。
具体的には次のようにします。
<RelativeLayout>
  <ScrollView>
    <RadioGroup>
    </RadioGroup>
  </ScrollView>
  <LinearLayout>
    < ... 操作するボタン群>
  </LinearLayout>
</RelativeLayout>
並び替えの実現方法
実装は至って単純です。
RadioButtonをレイアウトのRadioGroupから削除、追加するだけで実現できます。
使用するメソッドについて
int getCheckedRadioButtonId()
View findViewById(int id)
View getChildAt(int position)
void removeViewAt(int index)
void addView(View child, int index)
上記メソッドでは、チェックされているRadioButtonの取得、
idを指定したViewの取得、Viewの追加、削除などを行うのに利用します。
void setFocusable(boolean f)
void setFocusableInTouchMode(boolean f)
void requestFocus()
上記はフォーカス遷移に必要なメソッドです。
何故フォーカスの遷移が必要なのか?と言いますと、RadioButtonが画面の外にはみ出たとき、
それに合わせて画面をスクロースする処理が必要になります。
ScorllViewを直接操作する方法が分らなかったので、フォーカスを遷移する事で画面をスクロールさせます。
実際に動かしてみました
ソースコード
選択しているRadioButtonを上に移動させる場合の処理です。
- チェックしているラジオボタンのViewを取得
- 一番上に存在するViewも取得
- 選択しているViewが、一番上のViewなら何もしない
- そうでなければ、Viewをレイアウトから一旦削除
- 削除したViewを、インデックスを指定して挿入する
    //すぐ上のラジオを入れ替える
    //一番上の場合は何もしない
    private void swapViewFromUp() {

        int id = mRadioLayout.getCheckedRadioButtonId();
        RadioButton r = (RadioButton)mRadioLayout.findViewById(id);
        RadioButton first = (RadioButton)mRadioLayout.getChildAt(0);

        if (r != first) {

            int equalIdx = 0;
            for (int i = 0; i < mRadioLayout.getChildCount(); i++) {

                RadioButton tmp = (RadioButton)mRadioLayout.getChildAt(i);
                if (tmp == r) {

                    equalIdx = i;
                }
            }

            if (equalIdx > 0) {

                RadioButton tmp =
                    (RadioButton)mRadioLayout.getChildAt(equalIdx - 1);
                mRadioLayout.removeViewAt(equalIdx - 1);
                mRadioLayout.addView(tmp, equalIdx);

                r.setFocusable(true);           // ※1
                r.setFocusableInTouchMode(true);
                r.requestFocus();
                r.setFocusableInTouchMode(false);
                r.setFocusable(false);
            }
        }
    }
※1 やや不自然な気もしますが、SDK1.6だとこうしないとフォーカスが遷移してくれません。しかも、フォーカスを遷移した後、解除してやらないと黄色く反転したままになります。
上記メソッドと殆ど同じ内容ですが、今度は一つ下に移動させる処理です。
    //すぐ下のラジオを入れ替える
    //一番下の場合は何もしない
    private void swapViewFromDown() {

        int id = mRadioLayout.getCheckedRadioButtonId();
        RadioButton r = (RadioButton)mRadioLayout.findViewById(id);
        int lastIdx = mRadioLayout.getChildCount() - 1;
        RadioButton last = (RadioButton)mRadioLayout.getChildAt(lastIdx);

        if (r != last) {

            int equalIdx = 0;
            for (int i = 0; i < mRadioLayout.getChildCount(); i++) {

                RadioButton tmp = (RadioButton)mRadioLayout.getChildAt(i);
                if (tmp == r) {

                    equalIdx = i;
                }
            }

            if (equalIdx < lastIdx) {

                RadioButton tmp =
                    (RadioButton)mRadioLayout.getChildAt(equalIdx + 1);
                mRadioLayout.removeViewAt(equalIdx + 1);
                mRadioLayout.addView(tmp, equalIdx);

                r.setFocusable(true);
                r.setFocusableInTouchMode(true);
                r.requestFocus();
                r.setFocusableInTouchMode(false);
                r.setFocusable(false);
            }
        }
    }
初期化処理では、RadioButtonをクラス内で作成しています。
その際、IDとテキストも一緒にセットしてやります、
    RadioGroup.LayoutParams params = new RadioGroup.LayoutParams(
                RadioGroup.LayoutParams.FILL_PARENT,
                RadioGroup.LayoutParams.WRAP_CONTENT);

    RadioButton []radioArray = new RadioButton[arr.length];
    for (int i = 0; i < arr.length; i++) {

        radioArray[i] = new RadioButton(this);
        radioArray[i].setLayoutParams(params);
        radioArray[i].setTextColor(0xffffff);
        radioArray[i].setTextSize(22.0f);
        radioArray[i].setGravity(Gravity.LEFT);
        radioArray[i].setText(arr[i]);
        radioArray[i].setId(i);


        mRadioLayout.addView(radioArray[i]);
    }

    radioArray[0].setChecked(true);
ボタンが押されたタイミングで、上記メソッドを呼んであげればRadioButtonを移動させることが出来ますね。
(onClick()など)
それから、いつになるか分かりませんが、ListViewでの動的な並び替えについても調査したいと思います。
LinearLayoutとRelativeLayoutの使い方をまとめてみた
Androidアプリで画面を作成する際、LinearLayoutとRelativeLayoutの使い方をしっかり把握しておかないと、後々苦労することが多いと思いますので、レイアウト構成を自分の知る範囲でまとめてみました。
RelativiLayoutの場合
5 両端固定幅、真ん中は幅いっぱい
6 上記のレイアウトに追従する形で配置
7 上下に両端、真ん中配置のボタンを配置
8 上記レイアウトの空白を埋める配置(ListView等)
9 上記レイアウト中央の両端に、ボタンを配置
10 相互に作用する配置
XML
<LinearLayout
    android:layout_width="fill_parent"
    android:layout_height="fill_parent"
    android:orientation="horizontal">
    <Button
        android:layout_width="fill_parent"
        android:layout_height="wrap_content"
        android:text="@string/button"
        android:layout_weight="1">
    </Button>
    <Button
        android:layout_width="fill_parent"
        android:layout_height="wrap_content"
        android:text="@string/button"
        android:layout_weight="1">
    </Button>
    <Button
        android:layout_width="fill_parent"
        android:layout_height="wrap_content"
        android:text="@string/button"
        android:layout_weight="1">
    </Button>
</LinearLayout>
<LinearLayout
    android:layout_width="fill_parent"
    android:layout_height="fill_parent"
    android:orientation="horizontal">
    <Button
        android:layout_width="fill_parent"
        android:layout_height="wrap_content"
        android:text="@string/button"
        android:layout_weight="1">
    </Button>
    <Button
        android:layout_width="wrap_content"
        android:layout_height="wrap_content"
        android:text="@string/button">
    </Button>
</LinearLayout>
<LinearLayout
    android:layout_width="fill_parent"
    android:layout_height="fill_parent"
    android:orientation="horizontal">
    <LinearLayout
        android:layout_width="fill_parent"
        android:layout_height="fill_parent"
        android:orientation="horizontal"
        android:layout_weight="1">
        <Button
            android:layout_width="fill_parent"
            android:layout_height="wrap_content"
            android:text="@string/button"
            android:layout_weight="1">
        </Button>
    </LinearLayout>
    <LinearLayout
        android:layout_width="fill_parent"
        android:layout_height="fill_parent"
        android:orientation="horizontal"
        android:layout_weight="1">
        <Button
            android:layout_width="fill_parent"
            android:layout_height="wrap_content"
            android:text="@string/button"
            android:layout_weight="1">
        </Button>
        <Button
            android:layout_width="fill_parent"
            android:layout_height="wrap_content"
            android:text="@string/button"
            android:layout_weight="1">
        </Button>
    </LinearLayout>
</LinearLayout>
<LinearLayout
    android:layout_width="fill_parent"
    android:layout_height="fill_parent"
    android:orientation="vertical">
    <LinearLayout
        android:layout_width="wrap_content"
        android:layout_height="fill_parent"
        android:orientation="vertical"
        android:layout_weight="1">
        <Button
            android:layout_width="wrap_content"
            android:layout_height="fill_parent"
            android:text="@string/button"
            android:layout_weight="1">
        </Button>
    </LinearLayout>
    <LinearLayout
        android:layout_width="wrap_content"
        android:layout_height="fill_parent"
        android:orientation="vertical"
        android:layout_weight="1">
        <Button
            android:layout_width="wrap_content"
            android:layout_height="fill_parent"
            android:text="@string/button"
            android:layout_weight="1">
        </Button>
        <Button
            android:layout_width="wrap_content"
            android:layout_height="fill_parent"
            android:text="@string/button"
            android:layout_weight="1">
        </Button>
    </LinearLayout>
</LinearLayout>
<RelativeLayout
    android:layout_width="fill_parent"
    android:layout_height="fill_parent">
    <Button
        android:id="@+id/btn1"
        android:layout_width="wrap_content"
        android:layout_height="wrap_content"
        android:text="@string/button"
        android:layout_alignParentTop="true"
        android:layout_alignParentLeft="true">
    </Button>
    <Button
        android:id="@+id/btn2"
        android:layout_width="fill_parent"
        android:layout_height="wrap_content"
        android:text="@string/button"
        android:layout_alignParentTop="true"
        android:layout_toLeftOf="@+id/btn3"
        android:layout_toRightOf="@+id/btn1">
    </Button>
    <Button
        android:id="@+id/btn3"
        android:layout_width="wrap_content"
        android:layout_height="wrap_content"
        android:text="@string/button"
        android:layout_alignParentTop="true"
        android:layout_alignParentRight="true">
    </Button>
</RelativeLayout>
<RelativeLayout
    android:layout_width="fill_parent"
    android:layout_height="fill_parent">
    <Button
        android:id="@+id/btn1"
        android:layout_width="wrap_content"
        android:layout_height="wrap_content"
        android:text="@string/button"
        android:layout_alignParentTop="true"
        android:layout_alignParentLeft="true">
    </Button>
    <Button
        android:id="@+id/btn2"
        android:layout_width="fill_parent"
        android:layout_height="wrap_content"
        android:text="@string/button"
        android:layout_alignParentTop="true"
        android:layout_toLeftOf="@+id/btn3"
        android:layout_toRightOf="@+id/btn1">
    </Button>
    <Button
        android:id="@+id/btn3"
        android:layout_width="wrap_content"
        android:layout_height="wrap_content"
        android:text="@string/button"
        android:layout_alignParentTop="true"
        android:layout_alignParentRight="true">
    </Button>
    <Button
        android:id="@+id/btn4"
        android:layout_width="wrap_content"
        android:layout_height="wrap_content"
        android:text="@string/button"
        android:layout_alignParentLeft="true"
        android:layout_below="@+id/btn2"
        android:layout_toLeftOf="@+id/btn2">
    </Button>
    <Button
        android:id="@+id/btn5"
        android:layout_width="fill_parent"
        android:layout_height="wrap_content"
        android:text="@string/button"
        android:layout_below="@+id/btn2"
        android:layout_toLeftOf="@+id/btn6"
        android:layout_toRightOf="@+id/btn4">
    </Button>
    <Button
        android:id="@+id/btn6"
        android:layout_width="wrap_content"
        android:layout_height="wrap_content"
        android:text="@string/button"
        android:layout_alignParentRight="true"
        android:layout_below="@+id/btn2"
        android:layout_toRightOf="@+id/btn2">
    </Button>
</RelativeLayout>
<RelativeLayout
    android:layout_width="fill_parent"
    android:layout_height="fill_parent">
    <Button
        android:id="@+id/btn1"
        android:layout_width="wrap_content"
        android:layout_height="wrap_content"
        android:text="@string/button"
        android:layout_alignParentTop="true"
        android:layout_alignParentLeft="true">
    </Button>
    <Button
        android:id="@+id/btn2"
        android:layout_width="fill_parent"
        android:layout_height="wrap_content"
        android:text="@string/button"
        android:layout_alignParentTop="true"
        android:layout_toLeftOf="@+id/btn3"
        android:layout_toRightOf="@+id/btn1">
    </Button>
    <Button
        android:id="@+id/btn3"
        android:layout_width="wrap_content"
        android:layout_height="wrap_content"
        android:text="@string/button"
        android:layout_alignParentTop="true"
        android:layout_alignParentRight="true">
    </Button>


    <Button
        android:id="@+id/btn4"
        android:layout_width="wrap_content"
        android:layout_height="wrap_content"
        android:text="@string/button"
        android:layout_alignParentBottom="true"
        android:layout_alignParentLeft="true">
    </Button>
    <Button
        android:id="@+id/btn5"
        android:layout_width="fill_parent"
        android:layout_height="wrap_content"
        android:text="@string/button"
        android:layout_alignParentBottom="true"
        android:layout_toLeftOf="@+id/btn6"
        android:layout_toRightOf="@+id/btn4">
    </Button>
    <Button
        android:id="@+id/btn6"
        android:layout_width="wrap_content"
        android:layout_height="wrap_content"
        android:text="@string/button"
        android:layout_alignParentBottom="true"
        android:layout_alignParentRight="true">
    </Button>
</RelativeLayout>
<RelativeLayout
    android:layout_width="fill_parent"
    android:layout_height="fill_parent">
    <Button
        android:id="@+id/btn1"
        android:layout_width="wrap_content"
        android:layout_height="wrap_content"
        android:text="@string/button"
        android:layout_alignParentTop="true"
        android:layout_alignParentLeft="true">
    </Button>
    <Button
        android:id="@+id/btn2"
        android:layout_width="fill_parent"
        android:layout_height="wrap_content"
        android:text="@string/button"
        android:layout_alignParentTop="true"
        android:layout_toLeftOf="@+id/btn3"
        android:layout_toRightOf="@+id/btn1">
    </Button>
    <Button
        android:id="@+id/btn3"
        android:layout_width="wrap_content"
        android:layout_height="wrap_content"
        android:text="@string/button"
        android:layout_alignParentTop="true"
        android:layout_alignParentRight="true">
    </Button>

    <Button
        android:id="@+id/btn7"
        android:layout_width="fill_parent"
        android:layout_height="fill_parent"
        android:text="@string/button"
        android:layout_below="@+id/btn2"
        android:layout_above="@+id/btn5">
    </Button>

    <Button
        android:id="@+id/btn4"
        android:layout_width="wrap_content"
        android:layout_height="wrap_content"
        android:text="@string/button"
        android:layout_alignParentBottom="true"
        android:layout_alignParentLeft="true">
    </Button>
    <Button
        android:id="@+id/btn5"
        android:layout_width="fill_parent"
        android:layout_height="wrap_content"
        android:text="@string/button"
        android:layout_alignParentBottom="true"
        android:layout_toLeftOf="@+id/btn6"
        android:layout_toRightOf="@+id/btn4">
    </Button>
    <Button
        android:id="@+id/btn6"
        android:layout_width="wrap_content"
        android:layout_height="wrap_content"
        android:text="@string/button"
        android:layout_alignParentBottom="true"
        android:layout_alignParentRight="true">
    </Button>
</RelativeLayout>
<RelativeLayout
    android:layout_width="fill_parent"
    android:layout_height="fill_parent">
    <Button
        android:id="@+id/btn1"
        android:layout_width="wrap_content"
        android:layout_height="wrap_content"
        android:text="@string/button"
        android:layout_alignParentTop="true"
        android:layout_alignParentLeft="true">
    </Button>
    <Button
        android:id="@+id/btn2"
        android:layout_width="fill_parent"
        android:layout_height="wrap_content"
        android:text="@string/button"
        android:layout_alignParentTop="true"
        android:layout_toLeftOf="@+id/btn3"
        android:layout_toRightOf="@+id/btn1">
    </Button>
    <Button
        android:id="@+id/btn3"
        android:layout_width="wrap_content"
        android:layout_height="wrap_content"
        android:text="@string/button"
        android:layout_alignParentTop="true"
        android:layout_alignParentRight="true">
    </Button>

    <Button
        android:id="@+id/btn7"
        android:layout_width="fill_parent"
        android:layout_height="fill_parent"
        android:text="@string/button"
        android:layout_below="@+id/btn2"
        android:layout_above="@+id/btn5"
        android:layout_toLeftOf="@+id/btn2">
    </Button>
    <Button
        android:id="@+id/btn8"
        android:layout_width="fill_parent"
        android:layout_height="fill_parent"
        android:text="@string/button"
        android:layout_below="@+id/btn2"
        android:layout_above="@+id/btn5"
        android:layout_toLeftOf="@+id/btn9"
        android:layout_toRightOf="@+id/btn7">
    </Button>
    <Button
        android:id="@+id/btn9"
        android:layout_width="fill_parent"
        android:layout_height="fill_parent"
        android:text="@string/button"
        android:layout_below="@+id/btn2"
        android:layout_above="@+id/btn5"
        android:layout_toRightOf="@+id/btn2">
    </Button>

    <Button
        android:id="@+id/btn4"
        android:layout_width="wrap_content"
        android:layout_height="wrap_content"
        android:text="@string/button"
        android:layout_alignParentBottom="true"
        android:layout_alignParentLeft="true">
    </Button>
    <Button
        android:id="@+id/btn5"
        android:layout_width="fill_parent"
        android:layout_height="wrap_content"
        android:text="@string/button"
        android:layout_alignParentBottom="true"
        android:layout_toLeftOf="@+id/btn6"
        android:layout_toRightOf="@+id/btn4">
    </Button>
    <Button
        android:id="@+id/btn6"
        android:layout_width="wrap_content"
        android:layout_height="wrap_content"
        android:text="@string/button"
        android:layout_alignParentBottom="true"
        android:layout_alignParentRight="true">
    </Button>
</RelativeLayout>
<RelativeLayout
    android:layout_width="fill_parent"
    android:layout_height="fill_parent">
    <Button
        android:id="@+id/btn1"
        android:layout_width="fill_parent"
        android:layout_height="wrap_content"
        android:text="@string/button"
        android:layout_alignParentTop="true"
        android:layout_toLeftOf="@+id/btn2">
    </Button>
    <Button
        android:id="@+id/btn2"
        android:layout_width="wrap_content"
        android:layout_height="fill_parent"
        android:text="@string/button"
        android:layout_alignParentTop="true"
        android:layout_alignParentRight="true"
        android:layout_above="@+id/btn3">
    </Button>
    <Button
        android:id="@+id/btn3"
        android:layout_width="fill_parent"
        android:layout_height="wrap_content"
        android:text="@string/button"
        android:layout_alignParentBottom="true"
        android:layout_toRightOf="@+id/btn4">
    </Button>
    <Button
        android:id="@+id/btn4"
        android:layout_width="wrap_content"
        android:layout_height="fill_parent"
        android:text="@string/button"
        android:layout_alignParentBottom="true"
        android:layout_alignParentLeft="true"
        android:layout_below="@+id/btn1">
    </Button>
    <Button
        android:id="@+id/btn5"
        android:layout_width="fill_parent"
        android:layout_height="fill_parent"
        android:text="@string/button"
        android:layout_below="@+id/btn1"
        android:layout_above="@+id/btn3"
        android:layout_toRightOf="@+id/btn4"
        android:layout_toLeftOf="@+id/btn2">
    </Button>
</RelativeLayout>
<RelativeLayout
    android:layout_width="fill_parent"
    android:layout_height="fill_parent">
    <LinearLayout
        android:id="@+id/LayoutLeft"
        android:layout_width="fill_parent"
        android:layout_height="wrap_content"
        android:layout_toLeftOf="@+id/LayoutRight"
        android:orientation="vertical">
        <Button
            android:id="@+id/btn1"
            android:layout_width="fill_parent"
            android:layout_height="wrap_content"
            android:text="@string/button">
        </Button>
        <Button
            android:id="@+id/btn2"
            android:layout_width="fill_parent"
            android:layout_height="wrap_content"
            android:text="@string/button">
        </Button>
    </LinearLayout>

    <LinearLayout
        android:id="@+id/LayoutRight"
        android:layout_width="wrap_content"
        android:layout_height="fill_parent"
        android:layout_alignParentRight="true"
        android:layout_above="@+id/LayoutDumy">
        <Button
            android:layout_width="wrap_content"
            android:layout_height="fill_parent"
            android:text="@string/button">
        </Button>
    </LinearLayout>

    <LinearLayout
        android:id="@+id/LayoutDumy"
        android:layout_width="wrap_content"
        android:layout_height="wrap_content"
        android:layout_below="@+id/LayoutLeft">
    </LinearLayout>
</RelativeLayout>
<RelativeLayout
    android:layout_width="fill_parent"
    android:layout_height="fill_parent">
    <LinearLayout
        android:id="@+id/LayoutLeft"
        android:layout_width="fill_parent"
        android:layout_height="wrap_content"
        android:layout_toLeftOf="@+id/LayoutDumy2"
        android:orientation="vertical">
        <Button
            android:id="@+id/btn1"
            android:layout_width="fill_parent"
            android:layout_height="wrap_content"
            android:text="@string/button">
        </Button>
        <Button
            android:id="@+id/btn2"
            android:layout_width="fill_parent"
            android:layout_height="wrap_content"
            android:text="@string/button">
        </Button>
    </LinearLayout>

    <LinearLayout
        android:id="@+id/LayoutRight"
        android:layout_width="wrap_content"
        android:layout_height="fill_parent"
        android:layout_alignParentRight="true"
        android:orientation="horizontal"
        android:layout_toRightOf="@+id/LayoutDumy2"
        android:layout_above="@+id/LayoutDumy1">
        <Button
            android:layout_width="fill_parent"
            android:layout_height="fill_parent"
            android:text="@string/button"
            android:layout_weight="1">
        </Button>
        <Button
            android:layout_width="fill_parent"
            android:layout_height="fill_parent"
            android:text="@string/button"
            android:layout_weight="1">
        </Button>
        <Button
            android:layout_width="fill_parent"
            android:layout_height="fill_parent"
            android:text="@string/button"
            android:layout_weight="1">
        </Button>
    </LinearLayout>

    <LinearLayout
        android:id="@+id/LayoutDumy1"
        android:layout_width="wrap_content"
        android:layout_height="wrap_content"
        android:layout_below="@+id/LayoutLeft">
    </LinearLayout>
    <LinearLayout
        android:id="@+id/LayoutDumy2"
        android:layout_width="wrap_content"
        android:layout_height="wrap_content"
        android:layout_alignParentTop="true"
        android:layout_centerHorizontal="true">
    </LinearLayout>
</RelativeLayout>
今後のリリース予定について
AndroidMarketで公開中のかんたん家計簿ですが、
今後のリリース予定について記載しておきます。
Version0.14.0での機能一覧
・記帳した収支を一覧、集計表示
・一日、一ヶ月、一年単位で分析
・グラフ分析機能(円グラフ、棒グラフ)
・テンプレート機能でかんたん入力
・収支項目のカスタマイズ
・検索機能、検索結果の編集
・カレンダー機能
・メモ帳機能
今後の機能追加予定
| レイアウト関連 |
|---|
| UIの改良 → 完了(v 0.12.0) |
| 一覧画面のUIを改良 |
| グラフ機能 |
| グラフ表示画面の改良 → 完了(v 0.14.0) |
| 項目内訳のグラフ表示 → 完了(v 0.16.0) |
| 集計結果を表示する画面を改良 → 完了(v 0.12.0) |
| その他 |
| フリック操作で日付変更 → 完了(v 0.15.0) |
| 一週間単位での集計分析 → 完了(v 0.16.0) |
| 収支項目等の並び替え → 完了(v 0.15.0) |
| 多国語対応(英語,北欧とか) |
| 検討中 |
| 画像添付機能(実装が難しそうです) |
| 口座入金、口座出金機能 |
| 毎月の予算設定機能。 |
| プリンタ接続後の印刷機能(技術不足のため実現が難しいと思います) |
有料版について
有料版と無料版の違いを下記表にまとめました。
有料版ダウンロードを検討されている方は、下記表を参考にしてください。
AndroidMarket
| 無料&有料 機能一覧 | ||
|---|---|---|
| 機能名称 | 無料版 | 有料版 |
| 広告の表示 | ○ | × |
| グラフ表示 | ○ | ○ |
| 家計簿の集計 | ○ | ○ |
| 収支項目のカスタマイズ | △(Max 12) | ○(Max 20) |
| 項目内訳のカスタマイズ | △(Max 30) | ○(Max 50) |
| テンプレートのカスタマイズ | (Max 5) | (Max 15) |
| 検索機能 | ○ | ◎ |
| カレンダー | ○ | ○ |
| メモ帳 | ○ | ○ |
| メモ帳出力機能 | × | ○ |
| 無料版からのデータ引き継ぎ | × | ○ |
| CSV出力 | × | ○ |
| バックアップ機能 | × | ○ |
| 自動バックアップ機能 | × | ○ |
| 電卓機能 | △ | ○ |
| 複数アカウント管理 | × | ○ |
| アカウント間での資金移動 | × | ○ |
| PDF出力 | × | ○ |
| 折れ線グラフ | ○ | ○ |
日本国内で入手できるAndroid端末を一覧にしてみた
現在までに日本国内では12機種のAndroid端末が売りだされている模様。
情報元はWikipediaなのですが、画面サイズや搭載しているセンサー等についての情報も補足してあるほうが良いなと思いましたので、一覧にしてみました。
情報元 → http://ja.wikipedia.org/wiki/Android
| 日本製Android 端末一覧 | ||||||
|---|---|---|---|---|---|---|
| 端末型番/ 名称 |
端末画像 | サイズ/解像度 | 搭載 | OS | キャリア/メーカー | |
| HT-03A / HTC Magic |
 |
56×113mm / 320*480 |
加速度 磁気 傾き 温度 |
1.6 | docomo / HTC |
|
| SO-01B/ Xperia X10 |
 |
63×119mm / 480×854 |
加速度 地磁気 |
1.6 or 2.1 | docomo / ソニーエリクソン |
|
| X06HT/ HTC Desire |
 |
60×119mm / 480×800 |
加速度 地磁気 明るさ |
2.1 | SoftBank / HTC |
|
| JN-DK01 |  |
149×83mm / 960×480 |
加速度 地磁気 明るさ 赤外線 |
1.6 | / シャープ |
|
| IS01 |  |
149×83mm / 960×480 |
地磁気センサ 加速度センサ 赤外線 |
1.6 | KDDI / シャープ |
|
| SH-10B/ LYNX |
 |
148×83mm / 960×480 |
加速度 照度 赤外線 |
1.6 | docomo / シャープ |
|
| PNAZ05MNA/ dynabook AZ |
 |
262×189.8mm / 1920×1080 |
- | 2.1 | / 東芝 |
|
| X06HTII/ HTC Desire |
60×119mm / 480×800 |
加速度 近接 照度 赤外線 |
2.2 | SoftBank / HTC |
||
| SC-02B/ GALAXY S |
 |
64×122mm / 480×800 |
軸加速度計 2軸傾計 |
2.2 | docomo / サムスン |
|
| 001HT/ HTC Desire HD |
68×123mm / 480×800 |
加速度 近接 照度 |
2.2 | SoftBank / HTC |
||
| SC-01C/ GALAXY Tab |
 |
121×191mm / 600×1024 |
加速度 | 2.2 | docomo / サムスン |
|
| IS03 |  |
63×121mm / 640×960 |
加速度3軸 地磁気3軸 赤外線 |
2.1 | KDDI / シャープ |
|


